Quality replacement dust cover rod, c-clip and torsion spring for AR style rifles. Changing them is very easy, but care must be taken to not lose the c-clips and to reassemble it correctly. Please read and follow the instructions below to get your new cover installed and ready to go: Push the hinge pin forward until you can see the little "c" clip, positioning it so the open end is toward you. Using small punches or a screw driver, very carefully push on each end of the clip until it pops off. It doesn't take much, so take it slow and easy. Force should not be required; the clip will be under the pin and easily removed. You can use tweezers, or a magnetic pickup, or carefully tilt the receiver until the clip comes out in your hand. Be careful it is small and is easily lost. Make note of the cover spring position. If you don't have a diagram, take a picture so you can put it back right later. Slide the hinge pin rearward, covering the spring with your hand so it is not lost when the tension is released. Keep working the rod rearward until it is clear. Go slow so you don't scratch your upper receiver. Installation is mostly reversing the above. An easy way to install the hinge pin spring is to position it with the short leg to the rear of the receiver, pointing up toward the ejection port. Push the hinge pin into the spring a bit. Grab the front part of the spring, lifting it away from the receiver and press the long leg down, allowing it to rest against the ejection port cover. Slide your hinge pin in the rest of the way. Line up the little slot on the hinge pin with the front wall of the hinge pin channel. Use the wall to slide the clip down against the pin and use a punch to push it into place. You'll hear an audible click as it engages properly.
Hochwertiges Ersatzteil-Kit für AR-15 Ejection Port Cover
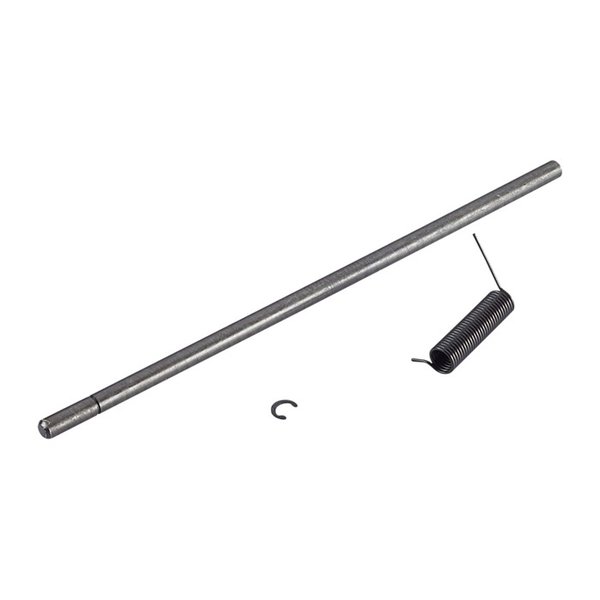
Das AR-15 EJECTION PORT COVER PARTS KIT ONLY von WILSON COMBAT bietet dir alles, was du für den Austausch des Staubschutzes benötigst. Es enthält eine Qualitäts-Ersatzstaubschutzstange, einen C-Clip und eine Torsionsfeder für AR-Stil Gewehre.
Einfacher Austausch
Der Austausch ist sehr einfach, aber achte darauf, die C-Clips nicht zu verlieren und alles korrekt wieder zusammenzusetzen. Hier sind die Schritte, um deinen neuen Staubschutz zu installieren:
- Schiebe den Scharnierstift nach vorne, bis du den kleinen "C" Clip sehen kannst, und positioniere ihn so, dass das offene Ende zu dir zeigt.
- Verwende kleine Stempel oder einen Schraubendreher und drücke sehr vorsichtig auf jedes Ende des Clips, bis er abspringt. Es braucht nicht viel, also gehe langsam und vorsichtig vor.
- Es sollte keine Kraft erforderlich sein; der Clip wird unter dem Stift sein und lässt sich leicht entfernen. Du kannst eine Pinzette oder einen Magnetheber verwenden oder den Empfänger vorsichtig kippen, bis der Clip in deiner Hand landet. Sei vorsichtig, er ist klein und kann leicht verloren gehen.
- Beachte die Position der Feder des Staubschutzes. Wenn du kein Diagramm hast, mache ein Foto, damit du es später richtig wieder einsetzen kannst.
- Schiebe den Scharnierstift nach hinten und halte die Feder mit deiner Hand, damit sie nicht verloren geht, wenn die Spannung gelöst wird.
- Arbeite weiter mit der Stange nach hinten, bis sie frei ist. Gehe langsam vor, damit du deinen oberen Empfänger nicht zerkratzst.
Installation
Die Installation erfolgt größtenteils durch Umkehrung der obigen Schritte. Eine einfache Möglichkeit, die Feder des Scharnierstifts zu installieren, besteht darin, sie mit dem kurzen Bein nach hinten zum Empfänger auszurichten, wobei sie nach oben zum Ejection Port zeigt.
- Drücke den Scharnierstift ein wenig in die Feder.
- Greife den vorderen Teil der Feder, hebe ihn vom Empfänger weg und drücke das lange Bein nach unten, sodass es gegen den Staubschutz ruht.
- Schiebe deinen Scharnierstift den Rest des Weges hinein.
- Richte den kleinen Schlitz am Scharnierstift mit der vorderen Wand des Scharnierstiftkanals aus. Verwende die Wand, um den Clip gegen den Stift zu schieben, und benutze einen Stempel, um ihn an seinen Platz zu drücken. Du wirst ein hörbares Klicken hören, wenn er richtig einrastet.